 Being the owner of a self improvement website, it follows that one of my favorite things to do in my life is automate whatever I can. The more I automate, the more I can get done in the finite hours I have in each day.
I have a Roomba that vacuums my house for me on a set schedule. Someone mows my grass for me in the warmer months, and I do things like listen to audiobooks when I drive to maximize my productivity during downtime.
When I started to publish more as Academy Success started to take off a little bit, I noticed I was spending a little too much time writing emails to send out blog posts to my email list. Of course I wanted to keep sending these emails because it’s the best way to make sure people get the content they were promised, but I also wanted to minimize the time I spent creating them without it coming off too impersonal.
Since I wrote to my readers in a pretty personalized tone in my blog posts already, all I really needed to do was to get over the technological hurdle piece in my email client – AWeber. Emails other than non blog posts would then be 100% automated.
Awesome!
It took me a little bit of research and tweaking, but I finally figured it out. This ends up saving me about 30 minutes of email setup each time I post an article – sometimes more depending on the content. Of course the time savings compounds as I write more and more content.
But enough yammering out of me.
Here’s the step by step process you can use to do this yourself.
Starting Out Your Blog Broadcast
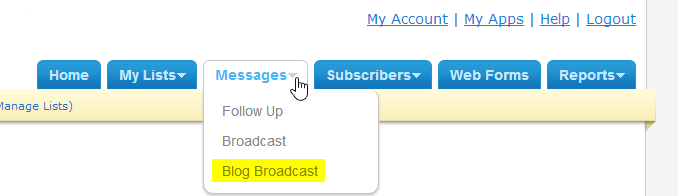
From the AWeber menu, make sure you have the list selected you want to set up a blog broadcast for, and click on “Blog Broadcast” from the “Messages” dropdown menu.
Once you’re in, you just need to follow a few simple steps to take care of this entire process.
First, start with the basic template, if you don’t already have an HTML template of your own. This will pull in a few of the dynamic fields for you, give you a nice clean slate to work with, and may make the process a little easier on you.
You may have to clear out some junk from what this pulls in depending on your tastes. AWeber didn’t exactly knock it out of the park with their default choices here.

Grab Your RSS Feed
Now, grab your RSS feed and paste it into the first box labeled “RSS Feed URL”.
Here’s mine just to show you an example (yes I need to change it from feedburner) 🙂
![]()
This is what will let AWeber know there is something new to be published to your readers.
There are a few different ways to do this depending on how yours RSS feed is set up. Here’s how to grab yours – https://codex.wordpress.org/WordPress_Feeds
Set Up Your Subject Line
After that, enter your subject line. You can use a combination of dynamic elements and your own text for this to create a compelling subject line for your readers.
Notice how I combined text with dynamic elements to create mine.
- I have “[AS]” in the subject line for “Academy Success.” This is how I help my readers to easily identify emails from me.
- I use the title of my blog post for the rest.

Set Up Your Email Body Content
Once your subject line is finished, now you move onto the meat – the post itself.
This can of course be done in a number of different ways. I opted to go with a pretty simple method of a dynamic introduction pulling in the subscriber’s first name for added personalization, then moving right into the content of the post naturally.
The post ends with a simple signoff signature and the required address element.
It’s important to note that these can be edited before you send them in case you want to add anything, like a PS line, or anything like that.
Here’s a resource on the AWeber KBase about what elements you can pull into this area. This helped me quite a bit to customize how I was setting mine up.
https://help.aweber.com/entries/21754037-What-Do-Variables-in-Blog-Broadcast-Templates-Do-
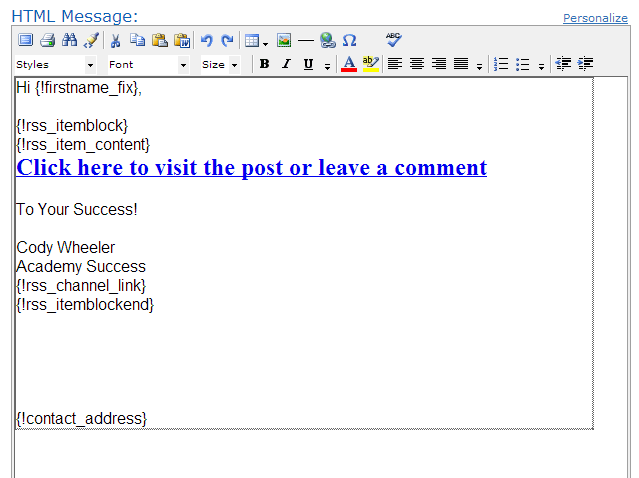
Here’s the Visual Editor view of how my code turned out (sans HTML). This will just insert the personal greeting, then go straight into the blog post, and close with the signature and address line.
Note that I have the “Click here to visit the post or leave a comment” line linked using “{!rss_item_link}” shown in the KBase article from above. That inserts a link directly to the blog post.
You can stop and go to the scheduling step from there, but I wasn’t really satisfied with the result just yet. I wanted to control the width of my email to match my blog. It just reads easier this way. To do this, I opted to use a table make sure things didn’t go full width in email clients. Yea.. old school, but it works 🙂
Here’s how to do that. You can copy that code directly if you want to use it. Just make sure to modify the Academy Success specific elements.
By the way, this is mostly AWeber generated code, with a few modifications – and I’m far from a professional coder – so don’t judge me :). It’s not the cleanest thing ever written, but it does the job well enough, and that’s what I’m worried about.
[code language=”html”]
<!DOCTYPE html PUBLIC "-//W3C//DTD XHTML 1.0 Transitional//EN" "https://www.w3.org/TR/xhtml1/DTD/xhtml1-transitional.dtd">
<html xmlns="https://www.w3.org/1999/xhtml">
<head>
<title>{!rss_channel_title}</title>
<meta https-equiv="content-type" content="text/html; charset=utf-8" />
</head>
<body style="margin: 0px; width: 580px">
<table cellpadding="0" cellspacing="0" width="580px" align="center">
<tbody>
<tr>
<td>
<div>
<div><span><font face="Arial">Hi {!firstname_fix},</font></span></div>
<div><span><font face="Arial"><br />
</font></span></div>
<div><span style="font-family: Arial">{!rss_itemblock}</span></div>
<div><span style="font-family: Arial">{!rss_item_content}</span></div>
<div>
<div><strong><a title="" href="{!rss_item_link}"><font size="5">Click here to visit the post or leave a comment</font></a></strong></div></div>
<div>
<div><span><font face="Arial"><br />
</font></span></div>
<div><span><font face="Arial">To Your Success!</font></span></div>
<div><span><font face="Arial"><br />
</font></span></div>
<div><span><font face="Arial">Cody Wheeler</font></span></div></div>
<div><span><font face="Arial">Academy Success</font></span></div>
<div><span><font face="Arial">{!rss_channel_link}</font></span></div>
<div><span><font face="Arial">{!rss_itemblockend}</font></span></div>
<div><font face="Arial"><span><br />
</span></font>
<div><span><font face="Arial"><br />
{!contact_address}</font></span></div></div></div></td></tr></tbody></table>
</body>
</html>
[/code]
Scheduling Your Content for Email
After you’ve done that, you’ll want to then set how your posts will go out. You can elect to do this manually by logging in and clicking Queue, or you can completely automate this process.
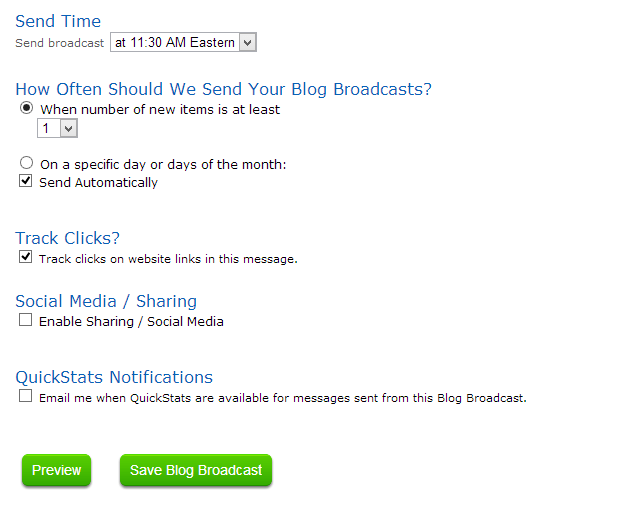
The settings below will automatically send posts at 11:30 AM EST each time there is at least one new post in the RSS feed. This makes it so you don’t even have to log in to AWeber to queue your post unless you want to add your own edits beyond what you wrote in the blog post.
Of course you can use whatever settings you wish.
Testing Your Email
You’ll want to test this to make sure it’s sending correctly. To do that, save your work with the “Save Blog Broadcast” button and then click on the “Test” button in the Blog Broadcast home screen.

This will just pull in the most recent post from your RSS feed and send it to whatever email address you choose. Follow the drill from there of sending yourself emails and tweaking until you’ve got it right.
Once you’ve got that done, you’re ready to go! Enjoy your newly found time!
Maybe you can use it to read The Lifehacker’s Manifesto 🙂